
There are so many different ways to go around building a van, and I don’t think there’s really a wrong or a right one. Some people do the floor first before they insulate their walls; some people insulate the whole van before they move on; some people leave the floor/flooring for later when they have their bed, kitchen, living area, etc all built. But with the van fully insulated (walls, ceiling, and floor) we decided to start the floor and then continued further and layed flooring. We now have a fully finished floor and it’s not something that we’ll have to come back to later to finish. Which is nice since we don’t like to have several jobs on the go/unfinished, although we know that won’t always be the case with the build.

Our original plan for the subfloor was to put the orginial floor that came with the van back in and then lay underlay and flooring on top of that. But when we went to pick it up from our storage we found it had grown mould in places where the wood was exposed to the elements as the protective coating had been worn away. (For those that didn’t know, sprinter floors are made of marine plywood).
After doing everything possble to prevent any mould growth and moisture build up in the van we were really reluctant to use the original floor now. So we decided to go in another direction. We would buy wood and than trace the shape of the original floor onto the new wood and use that instead.
We knew we wanted to have a subfloor that was water resistant so we automatically looked at buying sheets of marine plywood. Marine plywood already comes water resistant so it meant all we had to do was cut it to the right shape and lay it down in the van. Unfortunately marine plywood is not cheap and although we want to do things as best as possible we are still trying to do things as affordable as possible. So we weren’t ready to spend extra on this marine plywood.
If you are not worrying about budget/money marine plywood is a great option, and we would recommend it.
In the end we decided to just buy some regular plywood and then paint it with a water resistant, anti fungal paint. To our luck we actually found someone on Ebay that sells pre cut peices to perfectly fit your van floor (as long as your van is a Mercedes Sprinter). It was a little bit pricier than buying plywood and cutting it ourselves but it saved us so much time and effort, so we were happy to pay that little extra to save us that time.
So, the final outcome of what we did was; we bought custom pre cut peices of plywood that came ready to fit in the van, then painted each piece with a water resitant, anti fungal white exterior wood paint.
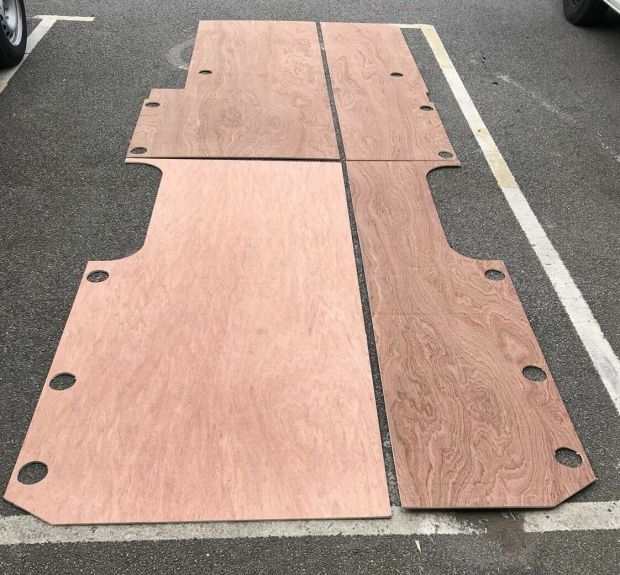
{ Photo from original Ebay posting. We ordered ours without the holes on the sides }
NOTE: We wanted the floor to be water resistant because if for any reason any moisture got below our actual flooring and onto the subfloor we don’t want the wood to soak up any moisture and possibly grow mould or start to rot.
Can you see a trend here? We’re focusing a lot on prevention instead of possibly having to redo things down the road.
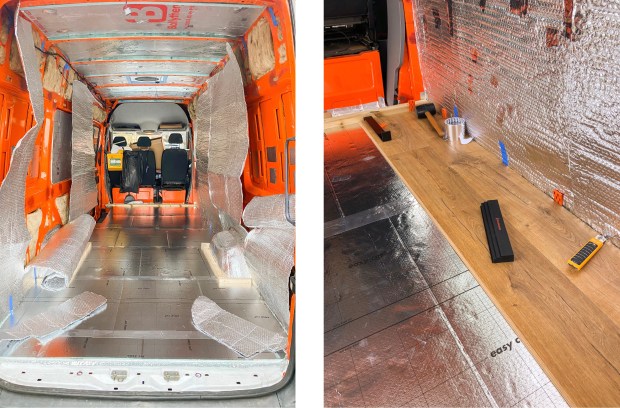
With the floor fully painted we were ready to finally install the subfloor. This part was super easy. We layed the peices down and then just screwed it down in a few places (we made sure to mark with tape where we had layed the wood that we used to frame the floor for insulation), and that was the subfloor down and finished.


I have to say, we took aaaaaaaaaaages to choose which flooring we wanted to go with. And, not gunna lie, we made several trips to B&Q in which we spent far too much time stood staring at the flooring and came out empty handed everytime.
In the end our final decision was this beautiful classic natural oak looking laminate click flooring. We knew from the beginning that we were going to go with laminate and not lino flooring because we had it in our flat and we didn’t like it at all, and we’ve seen vans that have it as well and again we just didn’t like it. So we just decided to go with the click laminate stuff.
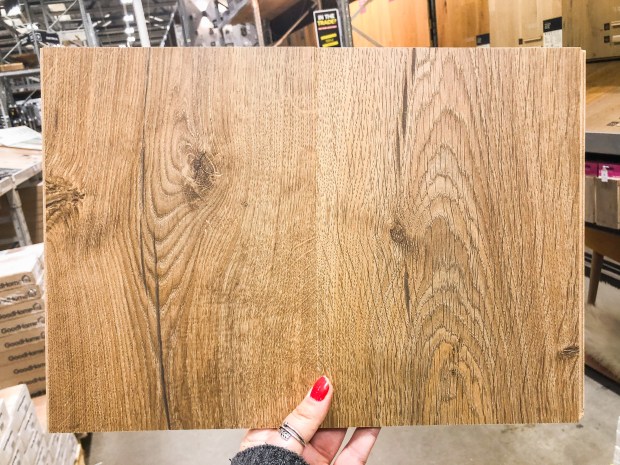
We went with the brand Quick-Step and their Aquanto range from B&Q. It’s water resistant, good for bathrooms and kitchens which means it’ll be suitable for the van, was only 8mm thick unlike most others that were 12mm, and it was decently priced which was a big thing for us. I personally wasn’t fully sold on the colour but it was Wills top choice and in the end we both actually LOVE the look of it with our white walls in the van.
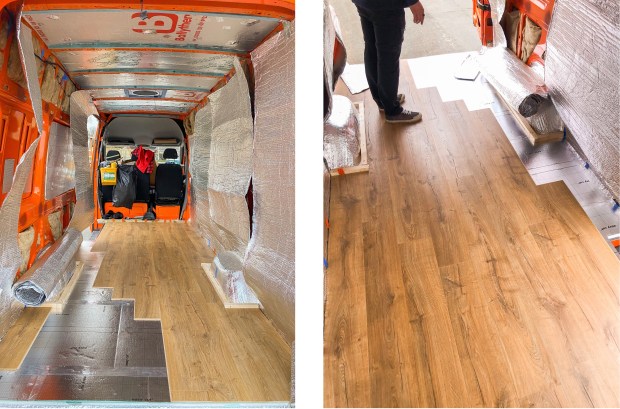
Laying the floor was pretty straigh forward, we put down a layer of underlay to add a bit of cushion and water protection and then just installed the flooring as we would have if we were putting in a house.


- Subfloor – purchased from Ebay
- Dulux TRADE Weather Shield Exterior paint – anti-mould, anti-fungal, water resistant paint that we used to seel the plywood subfloor peices.
- Diall 5mm Extruded Polystyrene Underlay – We used roughly two packs to cover the whole floor of the van. It can also act as a vapour barrier.
- Quick-Step Aquanto Flooring – In Classic Oak Effect. We did the whole floor of the van and it took exactly 4 boxes. It was exactly the right amount. We had one full extra peice plus some off cuts, which we were able to use on the side stip of the van.
- Magnusson 20 Piece Flooring Kit – We actually found this kit super helpful when installing the flooring, especially the tapping block. We tried a few pieces without it and ended up cracking a few edges, so we definitely recommened using something similar.

enthralling! Breaking: Major Changes Announced for [Organization/System] 2025 brilliant
LikeLike